PREDATOR Jaguar-supercharged E39 540i
Why make things easy for yourself? Why take the safe path, well trodden? Why buy an off-the-shelf supercharger kit for your E39 540i when you can build your own from scratch? Jonathan Pugh is a man for whom this is a mantra because that’s exactly what he’s done, making him part of a very exclusive club, with a very special BMW 5 Series.
Jon, currently working as an electrician but formerly a motorsport wiring electrician, may only be 23 but in the scant few years since he started driving he’s already managed to squeeze in a total of four BMWs and his passion for the Bavarian marque was instilled in him at an even younger age. “I have been interested in BMWs since I was about four years old,” he tells us. “My dad used to repair accident damaged vehicles in the ‘90s and they were mostly BMWs, mainly E36s but also E30s, E34s and E39s.
He re-shelled an E36 M3 Evo Saloon In the garage at home with a brand new shell from BMW and we have pictures of me at about four years old in the garage ‘helping’,” he laughs. “Ever since then I have been hooked on BMWs; when I was 16 I was looking at the usual first cars for cheap insurance and then I decided to try an E36 316i Coupe, and it was cheaper than most small hatchbacks! Before I could even drive I had bought black leather seats, black headlining and an M3 rear spoiler… I got the modifying bug from then on and it hasn’t stopped since, it only got worse!” he exclaims. The modifying continued when the E36 was followed by an E46 316i and then came an E39 525d Sport, which was the catalyst for Jon’s 540i purchase. “After having the E39 525d I fell in love with the way the E39 looks, drives and handles,” he says. “I wanted to be back in a petrol again and it had to be a V8 with a manual gearbox; I waited six months before the right car came up due their rarity, and I had to go 300 miles all the way to Glasgow for it. It wasn’t in great condition, it had many dents, scratches and some rust and it had also been standing for two and a half years prior to me buying it. The initial plan,” explains Jon, “was to get the car back to good condition and transfer some parts over from my current E39,” but then it all kind of got a little bit out of control.
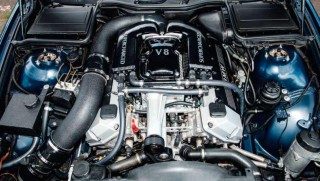
The supercharger is actually one of the last things that Jon did to his E39, but we’re too excited about it for it not to be the first thing we’re going to have to talk about. For a long time so many M6x V8 owners around the world have fantasised about doing what Jon has done, fitting the Eaton M112 supercharger from Jaguar’s late ’90s V8 XJR and XKR models, and with good reason. For starters, anyone can go and buy one of the two centrifugal supercharger kits available for the BMW V8 engine, have it fitted and enjoy 400 supercharged horses, and even though there aren’t many supercharged 540s or 740s doing the rounds, it’s almost too attainable, even if it is expensive. Also, while centrifugal superchargers deliver a big topend hit, positive displacement blowers, like the Eaton, delivery full boost virtually from the moment you put your foot down, which means massive mid-range torque and serious seat-stuffing shove, not to mention you get that distinctive and addictive supercharger whine. Finally, there is the fact that there are literally just a handful of people the world over who have successfully done this; there were some kits floating around, but they were full of false promise, and while it is now easier to make the supercharger fit and work, it’s still a massively involved project that requires a lot of work, research and knowledge to get everything working correctly and without any issues.
“After first seeing this setup in pictures online in America I had to take on the challenge myself,” says Jon, with an air of dogged determination about him. “This was in June 2015; after speaking with Steve, the pioneer behind this setup, I got on the lookout for all the required parts and even ended up with duplicates as bargains turned up on eBay. Once I had all the Jaguar parts I ordered the adapter kit from Steve and a month or so later it arrived at my door (Christmas 2015) but I didn’t get chance to look at it until February 2016 as I had been busy fitting my M5 LSD.” What the mysterious Steve did was to have adapters designed and made that would allow the supercharger’s manifold to line up with the intake ports on the BMW heads, which had previously been a huge hurdle and had required custom fabrication. “First on the agenda was having the rear mount machined off the supercharger as it is not required for this set up,” continues Jon. “A quick phone call the lads at GPE Engineering and before I knew it there was a modified supercharger in my hands. I had managed to pick up a 3.5 engine to allow test fitting of parts without losing the use of my car in the process, as it’s my daily. Once I began fitting parts I found that the rear supercharger support mounting holes where not properly located but Steve was able to send a replacement later on into the project, though for test fitting purposes it was usable.
“The next step was to mount the supercharger in place and look at the throttle body elbow/mounting. This was probably the most awkward part of the project as it requires extensive modifications, removing the EGR outlet to clear the rear water link pipe between the two heads, changing the throttle body hole spacing and shape from the Jaguar setup to the standard M62 throttle body. Also extra ports were required for the brake servo and tank vent valve; once again, thanks to GPE Engineering for their help with this. After the throttle body was in place I looked at the pulley alignment, which is where I lost a lot of time chasing an issue that turned out to be a couple of issues. Firstly, the supercharger was not sitting level, even after machining to Steve’s dimensions, so thicker nylon spacers where made to correct this. Even after the supercharger sat perfectly level the pulley alignment was still not square to the crank pulley; it turned out that the front supercharger mounting bracket had warped during the welding of the idler pulley spindle. A quick email to Steve saw a replacement made up along with a replacement rear mount that arrived a day before work on the project would begin on the car itself.
“While all this had been going on I had also designed a custom header tank to fit next to the ABS module for the chargecooler system, and this also arrived just in time for fitting. As I had acquired a spare set of Jaguar inlet manifolds I was able to have them powder coated black and the lettering polished in advance. In May 2016 the tear down began, removing the factory inlet manifold, injectors and wiring loom. Once I had a clear space I could test fit the supercharger for the first time and look at the intake piping to behind the front bumper where a K&N filter is located. After using various alloy bends to get the final route it was all removed ready for powder coating the following day. With parts sent off to the powder coaters I turned my attention back to the engine, changing the valley pan gasket – a common point of failure for the M62 engine – as well as changing various other gaskets along the way. After a day of rain stopped play I was straight back to building up the engine for the final time, with custom adapters in place, Jag fuel rails, as well as changing to an in-line fuel filter from the original M62 type with a built-in regulator, which meant adding a return line up to the new fuel rail setup. I also added two lambda bosses to the exhaust by the gearbox for the AFR gauges fitted inside the car to aide with the mapping.
“Enda from Endtuning was due to help me get the car running with the new setup,” says Jon, “and, after a few hours of road mapping we got to a point where we were happy with the tuning and called it a day. The following day I appeared to be having some running issues, fuel starvation and stuttering, which turned out to be a faulty Jaguar fuel pressure regulator, luckily I had another in the pile of spares and after changing that the problems went away. I then took it to a Mustang dyno where it made 386hp and 386lbft. I think a limiting factor on this setup is the factory Bosch ME7.2 ECU, as without a MAP sensor it can never see positive pressure. If a MAP sensor was present I think an even smoother and more refined power delivery could be achieved,” says Jon, but really we reckon that’s just him being a perfectionist. “So there you have it, nearly a year in planning and fitted in five days,” he adds with a smile and, considering the vast amount of work that went on behind the scenes to make this happen, that’s one hell of an achievement.
You cannot underestimate how huge an undertaking this supercharger project was and how impressive the end result is. Beyond the tech side of it all, the engine bay looks fantastic; your view is dominated by the supercharger, which looks like it could have been factory fitted, so neat is the installation, which was Jon’s plan all along, hence why he’s given the supercharger assembly the same black and silver colour scheme as the engine itself. As far as engine bay spectacle goes, it’s hard to beat.
Being as thorough in his work as he is, Jon has ensured that both transmission and chassis have received the attention they require in order to be able to cope with all of that under-bonnet wizardry. An M5 clutch has been fitted to better handle the power and torque along with an M5 propshaft, driveshaft and the aforementioned LSD in order to be able to actually use all of it and, while the car was originally fitted with a set of Apex lowering springs, it now sits on BC Racing coilovers, adjusted to a sensible but still sexy ride height. “I heard great things about the BC coilovers from many users, no matter the application, and factoring in the damping adjustment to fine-tune the handling to my preference made them the obvious choice. I also added M5 front and rear anti-roll bars mounted on Powerflex bushes and rebuilt the front suspension with new wishbones, drag link, track rods, fitted an M5 steering box. I also rebuilt the rear suspension with new subframe bushes, Powerflex diff bushes, new suspension arms, new bolts and I had it all powder coated silver.” He’s not forgotten about brakes, either, and up front you’ll find a set of custom-mounted BMW M Performance sixpot calipers, with drilled and grooved discs and Goodridge braided hoses all-round.
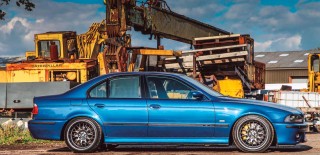
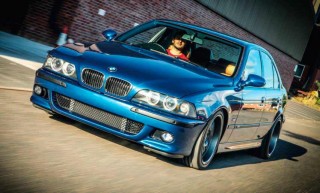
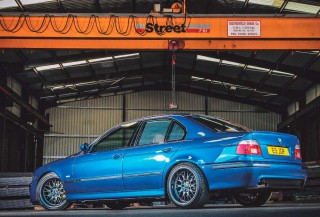
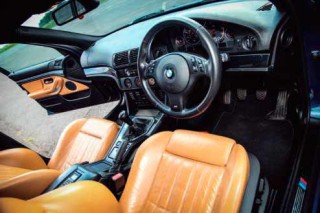
The exterior styling has been kept factory and subtle, but that’s not to say that this E39 isn’t an aggressive-looking thing with plenty of presence. The body has been treated to a full respray in original Topaz blue, but not before Jon’s dad spent most of his spare time over a whole month repairing, priming and sanding the body, and it was time well spent. There’s an M5 front bumper along with M5 mirrors while the wheels are staggered 18” Rondell 0058s, painted grey, which boast some serious dish on those 10” wide rears. Moving inside, at first glance there doesn’t appear to have been too much work put into the interior, but there’s so much more going on here than meets the eye. “The interior just sort of happened,” laughs Jon. “I was looking through eBay one evening and I found the listing for the full Heritage leather interior.
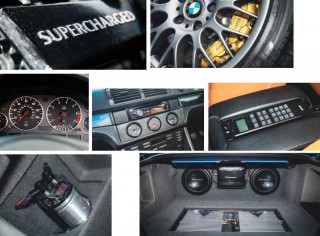
I agreed a price with the seller and got him to end the listing early to keep it away from anyone else, then I hired a van and made the 400 mile trip to collect it. It was in a sorry state but I could see its potential; I decided to use Gliptone products to bring it back to life. I spent around two weeks refurbishing all the leather panels, which there were a lot of, using a small compressor and spray gun to get the best, even results.” You see, Jon didn’t just buy the seats and the door cards inserts, he got the door cards themselves, which are finished in leather, and the leather lower dash panels, which were originally caramel as well but are now a more discreet black. He also carried out an electric steering column retrofit, had the steering wheel re-trimmed, added Technical Graphite interior trim, E38 illuminated interior door handles, a full rear blind set that required the door cards to be modified and he’s also transferred over the audio build from his previous E39, comprising a Pioneer head unit up front, a Pioneer mono amp powering twin Pioneers subs plus two Kenwood Performance Series amps, all in the boot.
Jon’s E39 really has it all, it’s such a complete build and the work that he’s put in throughout the car is seriously impressive. But it’s the supercharger which is both ours and his favourite mod on the whole car; “It changed the way the car felt and the whine is intoxicating, making driving it even more exciting,” he grins. But he bats away our question about possible future projects because he’s still fully committed to this one.
“I can’t see past this car, there’s still plenty more to come. If plans go ahead there will be some internal engine work to handle more boost along with a standalone management system to control things better and it should be sitting on Airlift Performance bags and a 3P management system very soon.” Somehow, we get that feeling that won’t be the end of it, either…
TECHNICAL DATA FILE Eaton Supercharged E39 540i
ENGINE AND TRANSMISSION 4.4-litre V8 M62TUB44, rocker covers powder coated silver, Eaton M112 positive displacement supercharger from Jaguar XJR, crackle black powder coated custom intake piping with K&N cone filter, relocated MAF sensor, Jaguar fuel rail, injectors and fuel pressure regulator with high flow fuel pump in tank, twin Jaguar chargecoolers, heat exchanger with Bosch electric water pump, 740d thermostat, custom engine wiring loom, de-catted exhaust manifolds and rear silencer delete. Six-speed manual gearbox, E60 545i short shift, M5 clutch, propshaft and driveshafts, M5 3.15 LSD
POWER AND TORQUE 386hp @ 6000rpm, 386lb ft @ 4000rpm
CHASSIS 8.5×18” (front) and 10×18” (rear) Rondell 0058 wheels in grey with 235/40 (front) and 265/35 (rear) tyres, BC Racing coilovers, M5 anti-roll bars with Powerflex bushes (front and rear), M5 steering box, rebuilt front and rear suspension, Powerflex diff bushes, all rear suspension powder coated silver, BMW M Performance six-piston Brembo calipers (front), drilled and grooved discs (front and rear), Goodridge braided hoses (front and rear)
EXTERIOR Full respray in original Topaz blue, M5 front bumper, M5 mirrors
INTERIOR Full M5 Heritage Caramel leather interior swap, leather door cards, leather lower dash panels, M Tech door mouldings, electric steering column retrofit, steering wheel re-trimmed with M tricolour stitching, Technical Graphite interior trim, E38 illuminated interior door handles, full rear blind pack for side windows and rear windows with rear door cards modified to fit, parcel shelf re-trimmed in Alcantara, Intravee to auto fold mirrors when locking, custom-mounted AEM wideband gauges and boost gauge, Pioneer DEH-X8500DAB head unit, Pioneer GM-D8601 Champion Series mono amp, 2x Pioneer Champion Series subs, 2x Kenwood PS200T Performance Series amps
THANKS Thanks to all the suppliers that have made this project possible. Thanks to everyone at GPE Engineering for all their help when it came to custom machining, Creative Aluminium Fabrications and Endtuning. A special thanks to Chris Steal who has spent many late nights, usually up against it, helping me like fitting an interior at 1am! Also thanks to my father, Geoff Pugh, for getting me into BMWs and all the time and effort he put in with the bodywork as I was a very fussy customer!


